Google+

Wednesday, January 18, 2012

How to hide item from menu if user has not right to it in Admin Section in nopCommerce?

Hi friend, I have faced some problem in nopCommerce settings . I asked these question in stack overflow  :

http://stackoverflow.com/questions/8741994/how-to-hide-item-from-menu-if-user-has-not-right-to-it-in-admin-section

My Question is :-

"I have create a new customer role "SubAdmin" with limited admin permission , assign it to any customer . When customer is login in admin section , he see same menu as administrator while he have not access right to some pages .
When customer trying to open those pages , it give access denied messages . I want to display only those pages in menu for which customer has right. "

Please check above link for answer.


Note:-Please comment and reply me.

Thursday, January 12, 2012

Create & Use Email Templates In Outlook 2010


While sending an email, sometimes you find out that it is the same email you have sent last week or few days back and you will probably need to send the exact email with same recipient address, subject, bodytext again in coming days. Before sending email, save it as an email template. Outlook 2010 provides you with an option to create an email template for later use. Thus, preventing you to compose same email over & over again.
To start out with creating a template, launch Outlook 2010, head over to Home tab and click New E-mail.

Start composing an email, enter recipients email address(es), subject and main email body text. Now on File menu, click Save as.

save as 1

From Save as type list, select Outlook Template and give template an appropriate name.
For using this template, navigate to Developer tab (in case you don’t find Developer tab, go to File menu, click Options, and in left pane click Customize Ribbon, from right pane enable Developer check-box. ClickOK to to see Developer tab on the ribbon.)
developer tab
Now head over to Developer tab, click Choose Form.
deve choose form
It will bring up Choose Form dialog, From Look In drop-down list, select User Templates in File System,from main dialog window, select the previously created template and click Open.
choose forms
It will immediately open email template, with same subject, recipients email addresses, theme and email body text. Now you can send it and use this template again by following the same procedure.


Git is...


Git is a free & open source, distributed version control system designed to handle everything from small to very large projects with speed and efficiency.
Every Git clone is a full-fledged repository with complete history and full revision tracking capabilities, not dependent on network access or a central server.Branching and merging are fast and easy to do.
Git is used for version control of files, much like tools such as MercurialBazaarSubversionCVSPerforce, and Team Foundation Server.

Tuesday, January 10, 2012

Daily Git

Hi everyone;
So long its been when I lost posted anything on my blog; The reason was again the same, some tight schedules and some other home activities; But Notw I’m back; Say welcome please;:)
Today’s post is simple; Me and my team is using Git now a days for my code management; So here are some git commands for daily usage; I’m not going to describing their usage in details; This post is for busy developer who just want to know the exact syntax of a command for a particular requirement;
So here we go;
Fetching code from a repository;git clone git@
This command will download all code from a particular git repository to your system; This is equivalence to SVN/CVS checkout;
git pull origin  Will fetch updated code from remote repository to your system; Its just like update in SVN/CVS;
Play with branches
git branch Will display all branches of your current repository
git branch dev Will create a new branch named dev, to current repository; Note that this branch is only to your local repository;
git checkout dev You will be switched to dev branch locally;
git checkout -f B2  Forcefully switch to B2, reverting all your changes of current working branch;
To commit your codegit status Will show all your changes for current working branch;
git add  Will add a file or directory in commit queue of git; This commit is only to your local repository; You can add one or more files/directories with this command and can your this command multiple times as well;
Tip: If there are more then on file in a directory, then just use the directory name in addcommand and git will all modified files to commit queue;
git add -u will removed deleted files from git status message; Sometimes many deleted files are shown in git status log, so this command will remove those deleted files form git’s logs;
git commit -m ‘message” Will commit the previously added files to current local repository;
To merger code from B1 branch to B2 branch
Assuming that you have pushed all your local changes to remote B1 branch ;
git checkout B2 Will switch you from previous branch to B2 branch;
git merge B1 Will merge the code in B2, from B1; (The code of B1 will be merged in B2 and B1 will remain intact) Again note that this change will occur only to your local repository;
git push origin B2  Will push your code to remove B2 branch, from your local repository;
To Revert your changes in local repository
git checkout path/to/file/to/revert This checks out the current index for the current directory, throwing away all changes in files from the current directory downwards.
git reset –hard HEAD Will revert all of your changes in current working branch;
If you know any command for git, just dont’ hesitate to share with us;
Happy Development; :)

Monday, January 9, 2012

How To Repair Virus-Infected PC When Windows Fails To Boot Up [Guide]

Although Antivirus suites including MS Security Essentials, Avira, Avast, Norton AntiVirus etc., help us protect the system from malwares, viruses, spywares, keyloggers and other like potentially harmful programs, sometimes malware infected applications manage to slip through deployed antivirus securitycracks and attack the system booting process. In such a case, anti-virus suites can’t identify and remove the infected application/processes unless the you repair the infected system boot sectors, and then boot into Windows to perform the virus removal operation over entire disk. In this post, we will show you how to clean your system from viruses when you can not boot into Windows.


Using SARDU (Shardana Antivirus Rescue Disk Utility)

When it comes to fixing system issues and scanning hard disks for viruses without booting the OS,SARDU offers a simple, yet powerful environment to perform numerous system repair operations. For those who aren’t familiar with SARDU, it can burn a number of bootable anti-virus suites, system repair utilities and Live Operating Systems on a single USB/CD, letting users perform all the essential operations to fix the issues. Since SARDU has been specifically designed to scan the system for viruses and identify OS boot up issues, you can use it to burn your favorite anti-virus rescue disk (if available) to USB, and then boot it to thoroughly scan the system for viruses and malwares. To begin, create a SARDU disk by following the steps mentioned here. it must be noted that you can choose to add multiple anti-virus utilities to your USB.


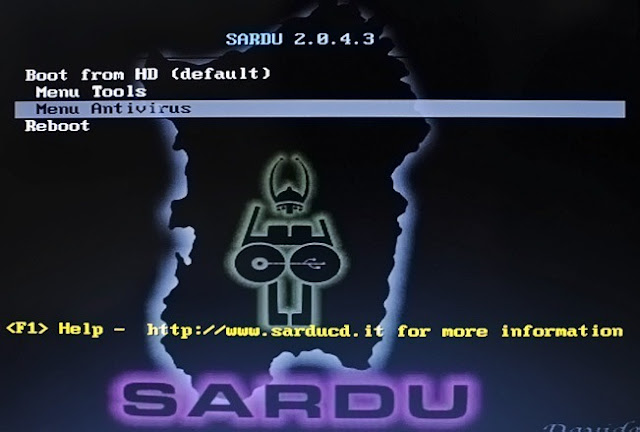
Once bootable antivirus utilities are burnt, plug-in the disk into virus infected PC, and open BIOS menu. Now, set External USB/Hard Disk as first boot option and reboot the system after saving changes made to BIOS. It will open SARDU boot menu, containing the selected anti-virus and system repair utilities. If you, for instance, chose to select AVG rescue disk while making SARDU bootable USB, navigate to Menu Antivirus, and then select Boot from AVG.


It will start loading AVG boot disk, and take you to AVG boot menu. Now, select AVG Rescue CD for performing virus scan operations.

When you select the AVG Rescue option, it will start mounting all the partitions. Once done, you will see the main menu, containing options to perform on-demand system scan, view previous scan results, configure anti-virus options and download essential update, run scripts for fixing known issues, changevirus database and so on. To perform the virus scan operation, navigate to Scan option, and hit Enter,
It will ask you to select either the volumes or specific directories within the mounted partitions to scan. We recommend selecting all the hard disk partitions in order to find the viruses and malwares. When volumes are selected, it will present the scanning options including scan inside archives, report password protected files, report archive bombs, use heuristics for scanning, scan cookies, recognize hidden extensions etc. To include additional scanning operations, navigate to the option you want to enable and hit Spacebar.


Once done, hit Enter to start the scanning the specified mounted volumes.


Hopefully, after following above steps, you will be able to completely remove system boot viruses and malware from the PC. If none of above methods work out for you, we recommend using Hiren’s Boot CD to perform boot-sector virus removal operations. You can check out this article to learn more about Hiren’s Boot CD.